Why You Should Start Using Visual Studio Code for Your .NET Projects
A step-by-step walkthrough of creating, running, and serving a .NET Web API entirely from Visual Studio Code, with no full Visual Studio required.
Visual Studio has been the default home for .NET developers for years, but it isn’t the only option anymore. In this article, I’ll show you how easy and fast it is to create and modify a Web API using Visual Studio Code from scratch, and why you might not want to go back.
Requirements
You’ll need the .NET SDK installed (the same one Visual Studio uses under the hood). You can grab it from the official .NET download page.
Confirm it’s installed correctly by running:
dotnet sdk checkYou should see something like this (versions will vary depending on what you installed):
Version                        Status
--------------------------------------------------------
9.0.302                        Patch 9.0.303 is available.
10.0.100-preview.6.25358.103   Up to date.
Step 1: Create the Project
- Create a folder for your project. In my case, I’ll use
dotnet-on-vsc. - Then, in your terminal, run:
dotnet new webapiNote: There’s a whole list of official templates you can start from. Run
dotnet new --listto see every available option.
This generates a generic project structure with files like Program.cs, appsettings.json, dotnet-on-vsc.csproj, and Properties/launchSettings.json, among others.
⚠️ By default, the app is created with HTTPS redirection enabled. To test it locally over plain HTTP, comment out the
app.UseHttpsRedirection();line in yourProgram.cs.
Step 2: Run the Project
Run the app from the terminal:
dotnet runYou should see something like:
Building...
Restore complete (0.4s)
You are using a preview version of .NET. See: https://aka.ms/dotnet-support-policy
  dotnet-on-vsc succeeded (3.2s) → bin\Debug\net10.0\dotnet-on-vsc.dll

Build succeeded in 4.1s
info: Microsoft.Hosting.Lifetime[14]
      Now listening on: http://localhost:5246
info: Microsoft.Hosting.Lifetime[0]
      Application started. Press Ctrl+C to shut down.
info: Microsoft.Hosting.Lifetime[0]
      Hosting environment: Development
info: Microsoft.Hosting.Lifetime[0]
      Content root path: path...\dotnet-on-vsc
Notice the line Now listening on: http://localhost:5246. Browse to http://localhost:5246/weatherforecast/ and you’ll see the sample API output.
Step 3: Serve Over HTTPS
If you leave HTTPS redirection enabled (the default), .NET will also bind an HTTPS endpoint:
You are using a preview version of .NET. See: https://aka.ms/dotnet-support-policy
  dotnet-on-vsc succeeded (0.3s) → bin\Debug\net10.0\dotnet-on-vsc.dll
Build succeeded in 1.1s
info: Microsoft.Hosting.Lifetime[14]
      Now listening on: https://localhost:7136
info: Microsoft.Hosting.Lifetime[14]
      Now listening on: http://localhost:5246
info: Microsoft.Hosting.Lifetime[0]
      Application started. Press Ctrl+C to shut down.
info: Microsoft.Hosting.Lifetime[0]
      Hosting environment: Development
info: Microsoft.Hosting.Lifetime[0]
      Content root path: folder...\dotnet-on-vsc
Now the same test API is served securely on https://localhost:7136. Browse to https://localhost:7136/weatherforecast/ to see the output.
Browser Warning: “Not Secure”
Your OS or browser may warn you that the site is unsafe. This is normal and easy to fix.
- To trust the local development certificate, run:
dotnet dev-certs https --trust- You’ll get a prompt like this. Click Yes:
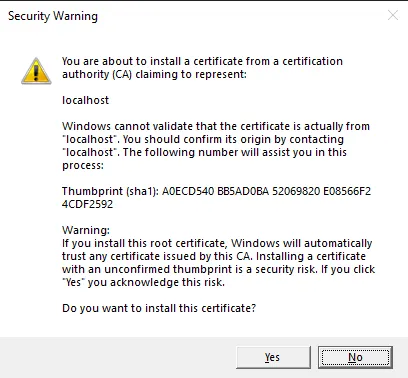
- After that, you’ll be able to use HTTPS locally without any warnings.
Note: If you’re on Linux and using Docker, setting up HTTPS locally can be a bit trickier depending on your configuration. I cover that in a separate article: Serve Your .NET API Locally in Ubuntu Using Docker.
Conclusion
Creating a .NET API in Visual Studio Code takes less than 10 minutes. The same flow works for larger projects originally created in full Visual Studio, so you get the flexibility to pick the right tool for the moment.
Personally, I’ve migrated almost entirely to Visual Studio Code and rarely need to go back. I’ve also found that managing my .NET projects through the CLI is easier and gives me more autonomy, and it mirrors exactly what I run in my CI/CD pipelines.
If you found this article helpful, share it with someone who’s still tied to a heavier IDE. I’m documenting technical tips that are useful in day-to-day development.